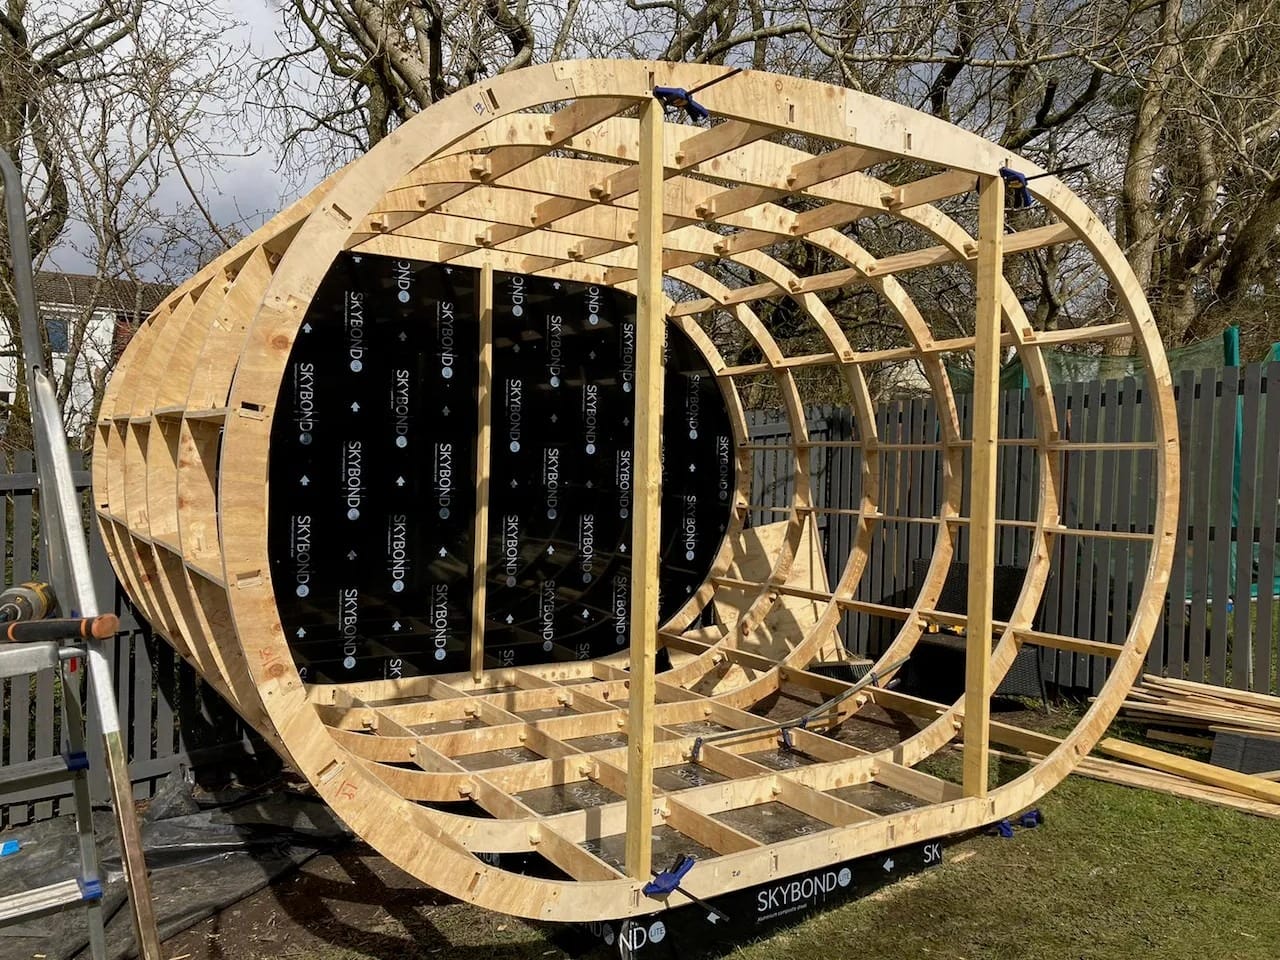
We’re super excited to show you our newest creation at Evo Pod, our 16′ x 8′ Gothic Glamping Pod Frame Kit. This 16′ x 8′ beauty brings medieval charm to your backyard, giving you a space that’s both Instagram-worthy and incredibly practical.
Glamping has taken off in many parts of the world. It’s more prevalent in the UK, where we’re from, and is gaining traction here in the US. People want to enjoy nature without sacrificing comfort and crave spaces with personality. That’s where our Gothic design shines. With its striking arches and dramatic lines, it stands out from those cookie-cutter sheds and garden rooms everyone else has.
Our precision CNC cutting takes the headache out of DIY building. Every piece is perfectly cut, pre-numbered, and designed to fit together like a dream. You don’t need to be a carpentry wizard to put this together – just a weekend, some basic tools, and a sense of adventure.
The Gothic Glamping Pod: A Unique Outdoor Experience
The Gothic glamping pod combines medieval-inspired architecture with modern comfort to create a distinctive outdoor accommodation. These eye-catching structures add a touch of drama and historical charm to any natural setting.
What Makes Gothic-Style Pods Different from Traditional Glamping Structures
Gothic pods stand out with their distinctive, dramatic silhouettes. Unlike typical oval glamping pods, these structures feature vertical emphasis and ornate details that create a bold statement in nature.
We’ve found that the higher ceilings and unique architectural elements give a sense of grandeur even in compact spaces. The vertical design allows for taller windows that flood the interior with natural light.
The angular construction creates more usable space inside compared to oval pod designs. Many of our customers appreciate how these pods become conversation pieces and destination attractions in themselves.
Gothic pods also offer better weather-shedding capabilities with their pitched roofs, making them practical for areas with heavy rain or snow.
The Appeal of Gothic Aesthetics in a Natural Setting
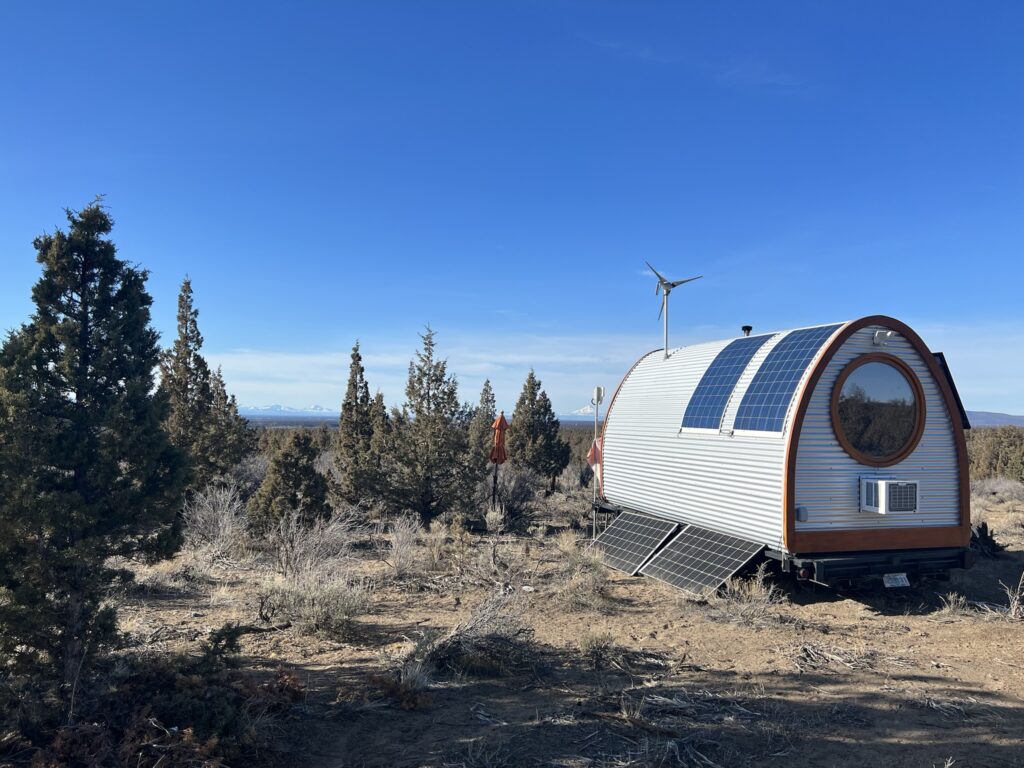
The contrast between ornate Gothic architecture and natural surroundings creates a magical, otherworldly effect. These pods look particularly stunning nestled among trees or overlooking dramatic landscapes.
Gothic pods have been installed in various settings, and they photograph beautifully in all seasons. They create perfect backdrops for social media-worthy stays that guests love to share online.
The dramatic silhouette catches the eye from a distance, making these pods excellent focus points for larger properties. Many clients tell us their gothic pods have become the most requested accommodation option.
There’s something inherently romantic and mysterious about Gothic architecture that appeals to guests seeking unique experiences. The historical connections add depth and storytelling opportunities for property marketing.
These structures offer a perfect blend of fantasy and function that modern travelers crave.
Year-Round Usability and Versatility for Multiple Applications
Gothic pod designs adapt well to various climates with proper insulation and heating/cooling systems. The steep roof pitch efficiently sheds snow in winter environments while providing excellent ventilation options for summer.
Customers can build these pods with multi-seasonal use in mind, incorporating features like underfloor heating and efficient windows. We’ve seen people use them as specialized accommodations, but they also work well as meditation spaces, art studios, or unique meeting venues.
The distinctive style makes these pods perfect for themed events, weddings, or special occasion rentals. And some have created mini “villages” with several gothic pods serving different functions.
With insulation options, customers can ensure comfort regardless of outside temperatures. The adaptable interior layout can be configured for various needs, from sleeping quarters to dining spaces or creative workshops.
Our Premium Materials and Construction

We’ve carefully selected each material in the Evo Pod Kit to create a structure that’s built to last. Our pods combine strength, insulation capabilities, and smart design to give you a space that feels premium from the moment you start building.
High-Quality 3/4″ Plywood for Exceptional Durability
We don’t cut corners when it comes to the foundation of your pod. Each Evo Pod Kit uses premium 3/4″ 11-ply plywood that’s been specifically chosen for its strength-to-weight ratio.
This isn’t your basic plywood from the hardware store. Our material undergoes rigorous testing to ensure it can handle various loads and weather conditions without warping or weakening.
The 3/4″ thickness hits the sweet spot between being lightweight enough to work with during assembly but sturdy enough to create a solid structure. Each sheet is precisely cut using computer-controlled equipment, giving you pieces that fit together perfectly.
Sturdy 1.5″ Thick Arches When Assembled for Professional-Grade Construction
The iconic curved design of our pods isn’t just for looks—it creates incredible structural integrity. When you connect the precision-cut sections, they form arches that measure 1.5″ in thickness.
This substantial profile gives your pod remarkable strength. The arch design naturally distributes weight and pressure across the entire structure rather than concentrating it at certain points.
- Optimal strength for snow loads and wind resistance
- Reasonable weight for manageable assembly
- Cost efficiency without compromising quality
The 1.5″ assembled thickness exceeds most building standards for similar structures. You’ll feel the difference when you step inside—a solid, flex-free floor and walls that don’t creak or give under pressure.
3.5″ Cross-Section Cavity Design for Insulation Flexibility
The assembled arches provide a 3.5″ cavity space within the walls and ceiling of every EvoPod. This thoughtful design gives you complete freedom to insulate your pod exactly how you need.
This spacious cross-section accommodates:
- Standard R-13 to R-15 fiberglass batts
- Rigid foam board insulation
- Spray foam insulation
- Natural wool or recycled denim alternatives
The 3.5″ depth works perfectly with standard insulation sizes, making your supply shopping much easier. For cold climates, you can maximize the full cavity with high R-value materials. In milder areas, you might choose a thinner insulation option with a small air gap.
The open framework of the EvoPod kit makes insulation installation straightforward, even for first-time builders. The cavity walls are clean and free from obstructions that might compress your insulation.
Pre-Drilled Channels for Convenient Electrical Wiring Integration
Nobody wants exposed wiring ruining the look of their beautiful new pod. That’s why we’ve incorporated pre-drilled channels throughout the structure.
These carefully mapped pathways allow you to:
- Run standard electrical wiring invisibly within walls
- Install outlets exactly where you need them
- Add lighting fixtures without complicated routing
- Keep all wiring safely away from moisture
Each channel aligns perfectly from panel to panel, creating continuous pathways throughout the pod.
The channels are sized to meet residential electrical codes and can accommodate standard Romex wiring. This thoughtful feature saves hours of drilling and planning.
Why Our Materials Matter for Longevity and Weather Resistance
We’ve learned that material quality directly impacts how long your pod will last and how it handles different weather conditions.
The precision cutting we use creates tight-fitting joints that minimize air and water infiltration. Fewer gaps mean better energy efficiency and less chance of water damage.
A pod built with our materials can easily last 15-25 + years with basic maintenance, depending on the chosen exterior materials. The quality difference becomes especially apparent in harsh climates where lesser materials would quickly deteriorate.
The EvoPod Frame Kit Components
The EvoPod frame kit gives you everything needed to build a solid, customizable pod structure. Each component is designed for easy assembly while maintaining professional-grade quality.
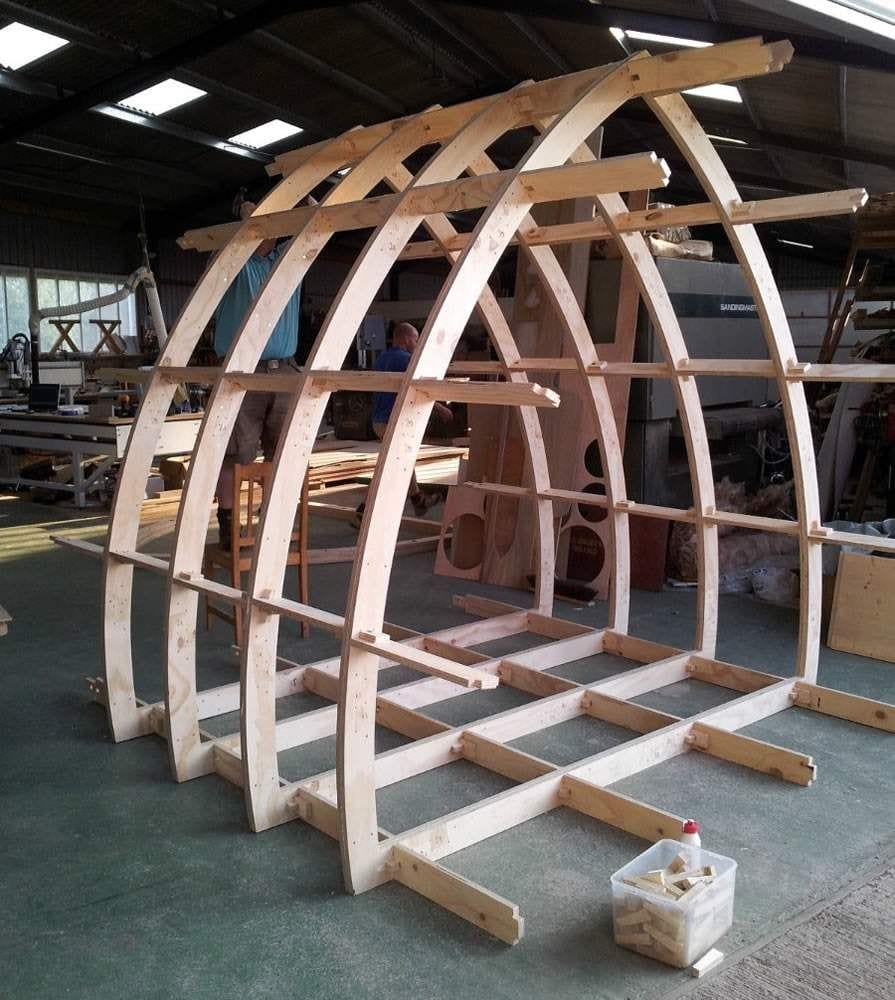
Pre-Cut Structural Frame Pieces with Precise CNC Manufacturing
We’ve taken the guesswork out of measuring and cutting with our precisely manufactured frame pieces. Each component is cut using advanced CNC technology to ensure perfect fits and joints every time.
You’ll find no rough edges or imperfect cuts here. Our precision manufacturing means holes align perfectly, corners meet at exact angles, and the whole structure comes together without forcing or adjusting pieces.
Numbered Components for Foolproof Assembly
Building your EvoPod is as simple as following the numbers. We’ve clearly labeled each component to match our step-by-step instructions.
The numbering system follows the logical assembly order, so you’ll never wonder what comes next. Even if you’ve never built anything before, you can confidently assemble your pod.
Our instructions include clear diagrams showing how each numbered piece fits together.
This system eliminates the frustration of traditional construction projects where sorting through similar-looking pieces can waste hours of your time.
Tusk Tenon and Wedge Joints System for Superior Structural Integrity
Our innovative joinery system uses traditional woodworking techniques, modernized for DIY builders. The tusk tenon and wedge joints create incredibly strong connections without complex tools.
These joints work by sliding tenons (projecting pieces) through mortises (slots) and securing them with wooden wedges. This creates a mechanical lock that gets stronger over time.
Unlike screws that can loosen, our joinery system actually tightens with normal use and seasonal wood movement. This means your pod stays solid for years.
The beauty of this system is that, depending on the exterior finishes chosen and ease of remova,l the EvoPod kit can be disassembled when needed, making your EvoPod truly portable if you ever need to relocate.
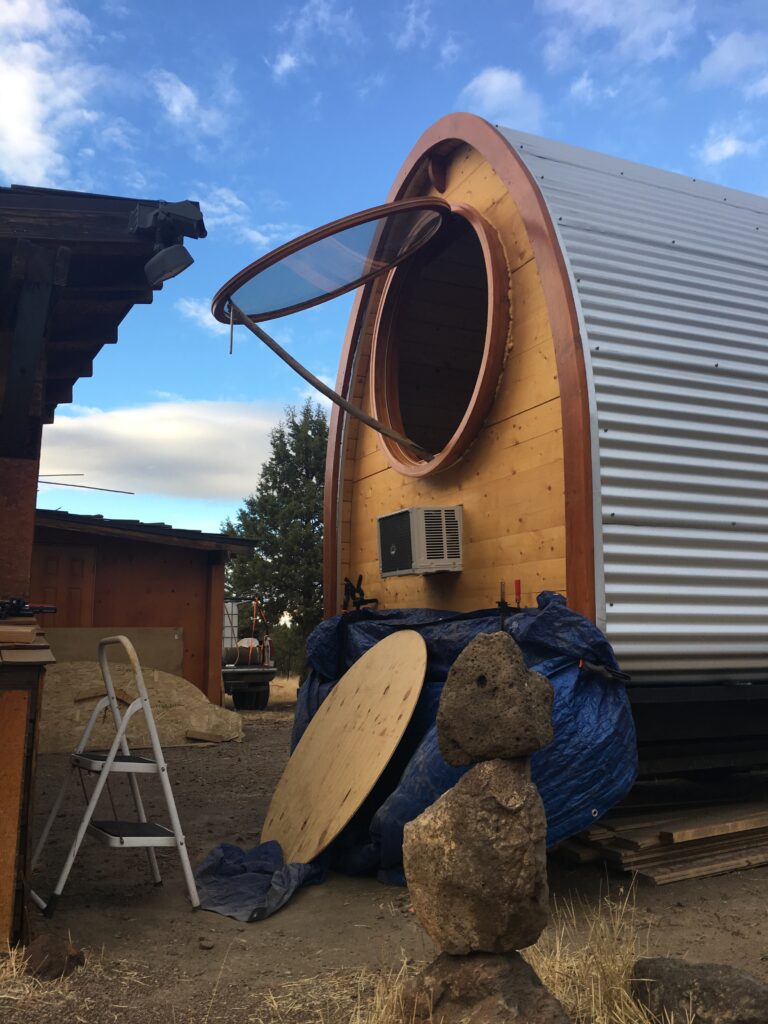
Open End Walls for Customization Opportunities
We’ve designed the EvoPod with open-ended possibilities. The end walls allow for your choice of windows, doors, or fully custom installations.
Each end wall features a strong arch end frame for whatever features you choose to add. Want a full glass wall? No problem. Prefer a Dutch door? Easy to install.
The flexibility doesn’t stop at openings. The interior wall surfaces are ready for your choice of finishes, from simple plywood paneling to decorative T & G paneling.
Step-by-Step Assembly Overview
Building your Evo Pod Kit is straightforward when you follow these simple steps. We’ve broken down the assembly process into manageable parts that anyone can handle, even if you’re new to DIY projects.
- Site Prep
- Tools Needed
- Frame Assembly using Numbered Parts
- Finish the Arch and the Ends Using Your Own Design
Site Preparation and Foundation Options
First, pick a level spot for your pod. We recommend clearing an area about 2 feet larger than your pod dimensions on all sides to give you working space.
For the foundation, you have several options. A concrete slab works great for permanent installations. It should be at least 4 inches thick and properly cured before setting the EvoPod frame.
For a quick solution, you can use pressure-treated wood skids placed directly on level ground. Just make sure the ground is firm and won’t settle unevenly.
Whatever foundation you choose, use a level to ensure it’s perfectly flat before starting your build.
Tools Needed: Waterproof Glue, Nail Gun/Nails or Screwdriver/Screws, Hammer
You’ll need a few basic tools to put your pod together. Don’t worry – nothing fancy required!
Essential Tools:
- Waterproof wood glue (we recommend Titebond III)
- Hammer (16 oz is perfect)
- Tape measure
- Level (2′ and 4′ lengths are helpful)
- Square for checking right angles
Fastener Options:
- Nail gun with 1-1/4″ and 3″ galvanized nails, OR
- Screwdriver with appropriate screws (for 20′ Gothic EvoPod 70 screws at 3″ and 150 screws at 1-1/4″)
Safety Equipment:
- Work gloves
- Safety glasses
- Dust mask for cutting panels
We also suggest having a helper for the frame and arch installation. Some pieces are bulky and much easier to position with an extra pair of hands.
Frame Assembly Using the Numbered Components
Our Evo Pod Kit comes with numbered pieces that make assembly super easy. Think of it like a big puzzle where all the parts are labeled!
Start with the arch frames. Pieces 1A through 10A form a single 3/4″ thick arch. Pieces 1 – 10 form a second arch which is then attached to the first arch by apply waterproof glue to all joining surfaces before securing with nails or screws. Use studs included in the kit to temporarily line up the two arches together. This is then repeated a number of times dependent on the size of your EvoPod. ( For the 20′ EvoPod, there are 12 structural arches, 18′ has 11 arches and 16′ has 10 arches. It is recommended to have a flat surface to lay out the arch pieces to make this easier.
Pro Tip: Don’t fully tighten all connections until the frame is complete. This gives you wiggle room to make adjustments and ensure everything is square.
Once the frame looks good, go back and secure all joints permanently.
Installing and Securing the Arched Sections
The arched sections are what give the Evo Pod its unique look. Each arch comes in two halves (marked 1a-10a and 1-10).
Start at one end of the pod. Position the first double arch piece ( 1.5″ thick when glued and fastened together) and insert the intermediate studs at the bottom. This will allow the arches to stand vertically while the Tusk and Tenon joints are assembled. We usually start with a non gable arch so that there is more stability on the first arch.
Work your way down the length of the pod, adding one arch at a time. Each should be spaced approx 19.5″ apart, but double-check your specific plan. The shortened horizontal connectors are for the gable ends only and should be attached to the end arches via screws rather than wedging T shaped spacers included in the kit are used to fill the gable end pocket in conjunction with one shortened horizontal connectors.
Continue to use the horizontal connectors to join the arches together. This creates the ribbed structure that will support your covering.
Make sure each arch is plumb (perfectly vertical) before final securing. Wobbly arches will cause problems later!
Customizing Your End Walls
The end walls offer the most opportunity for personalization. We provide standard panels, but you can modify them to suit your needs.
For a basic setup, attach the provided wall panels to the frame at each end. One end typically includes a door frame – install this first.
Want windows? Use the included templates to mark and cut openings in the panels. The kit includes window frames that snap into these openings.
For extra insulation, consider doubling up the end wall panels with a layer of rigid foam insulation between them.
Popular Customizations:
- Dutch door for better ventilation
- Extra windows for more light
- Custom paint or stain for weather protection
- Decorative trim around doors and windows
Take your time with these details – they’re what make your pod unique!
Build your own unique space
With the Evo Pod Kit, you can truly make a space that feels like yours. We’ve designed each component to fit together seamlessly while still allowing for your personal touch. Choose from various wall finishes, flooring options, and lighting configurations to match your style.
The modular design means you can start small and expand later. Many of our customers begin with a simple office pod and add features as they go. Some popular customizations include soundproofing panels, built-in desks, and smart home integration.
Don’t worry about complex installation—our pods are designed for easy assembly. Most customers complete their build in a weekend with basic tools. The instructions are clear and straightforward, with color-coded parts to help you along the way.
Contact The Evo Pod with any questions
We’re here to help you create your perfect pod! Our team of design specialists can answer questions about customization options, installation processes, or special requirements you might have.
Reach out to us via email at info@TheEvoPod.com Our typical response time is under 24 hours.
Check out our online gallery for inspiration from other EvoPod owners. INSERT LINK You can see real-world examples of how versatile our pods can be in different settings.